dev-guides
Vim Workflow
After hearing the frustrations of students in past years who have tried to do their assignments directly in the VM console, using a barebones text editor, we have created a guide for building out an improved developer workflow. We present instructions for how to set up git shortcuts and configure a robust Vim dev environment.
By the end of this guide, you will be able to:
- Have semantic auto-complete, file grepping, function GOTOs and more in your vim
- Impress non-OS friends with your vim wizardry
For the remainder of this guide, all changes will be made in the class virtual machine.
Vim Setup
Non-vim users: If you have a cool emacs/atom/etc setup, feel free to send us a guide and we will share it on the course website.
The remainder of this guide will be dedicated to building out a robust vim developer environment, so if you are not planning to use vim for this class jump straight to Cscope
Installation
First install the vim-gtk, clang, cmake, curl, python3 and python3-dev packages on your system package manager.
For example, on Debian:
# apt install vim-gtk clang cmake curl python3 python3-dev
We install vim-gtk over the default vim package because the default version is not compiled with python support, which is needed for the YouCompleteMe plugin later. (Don’t worry if you have already installed a different vim package before, vim-gtk will take priority over it.)
The Philosophy of Vim
Before diving into setup, I need to assert a critical point about working in vim: don’t use vim tabs! Instead, use buffers and windows.
Many of you taking this class have come fresh out of AP, where you first learned
to use vim. When I took OS I was in the same boat; all I had with me was Jae’s
.vimrc, a few keyboard shortcuts, and many bad habits. Unfortunately, no class
really teaches how to use vim, and as a result its easy to become glued to
functional, but inefficient methods.
For instance, if you repeatedly type :tabn/:tabp to navigate files, or if
you have 10 different terminal windows open, each ssh’d to the same remote
directory with 10 instances of vim open on 10 different files (aka me in AP) …
your workflow is probably suboptimal.
Thus, beyond installing plugins, the aim of this guide is to enforce efficient vim usage patterns that will save you tremendous amounts of time in the long run.
People who are most familiar with IDEs or sublime/atom expect to use tabs with vim because that is how these other editors work: the relationship is 1 tab per 1 file, and opening/closing a file requires opening/closing a tab. Vim however is not meant to be used this way–it was designed to work within a single terminal tab by utilizing multiple windows + multiple buffers.
Definitions:
- A Buffer is simply the raw data associated with an open file.
- A Window is a visual display for a buffer. A tab in Vim must have >= 1 window, and each window displays exactly 1 buffer.
- A Tab is a layout of windows, a viewport onto buffers
Here is an approximate translation from actions in sublime –> actions in vim:
- Open
file.cin a new tab –> Openfile.cin a new buffer, and move your window to display this buffer - Close tab of
file.c–> Close thefile.cbuffer - Open
file.cin a new column –> Openfile.cin a new window with either:vsp file.cor:sp file.c - etc.
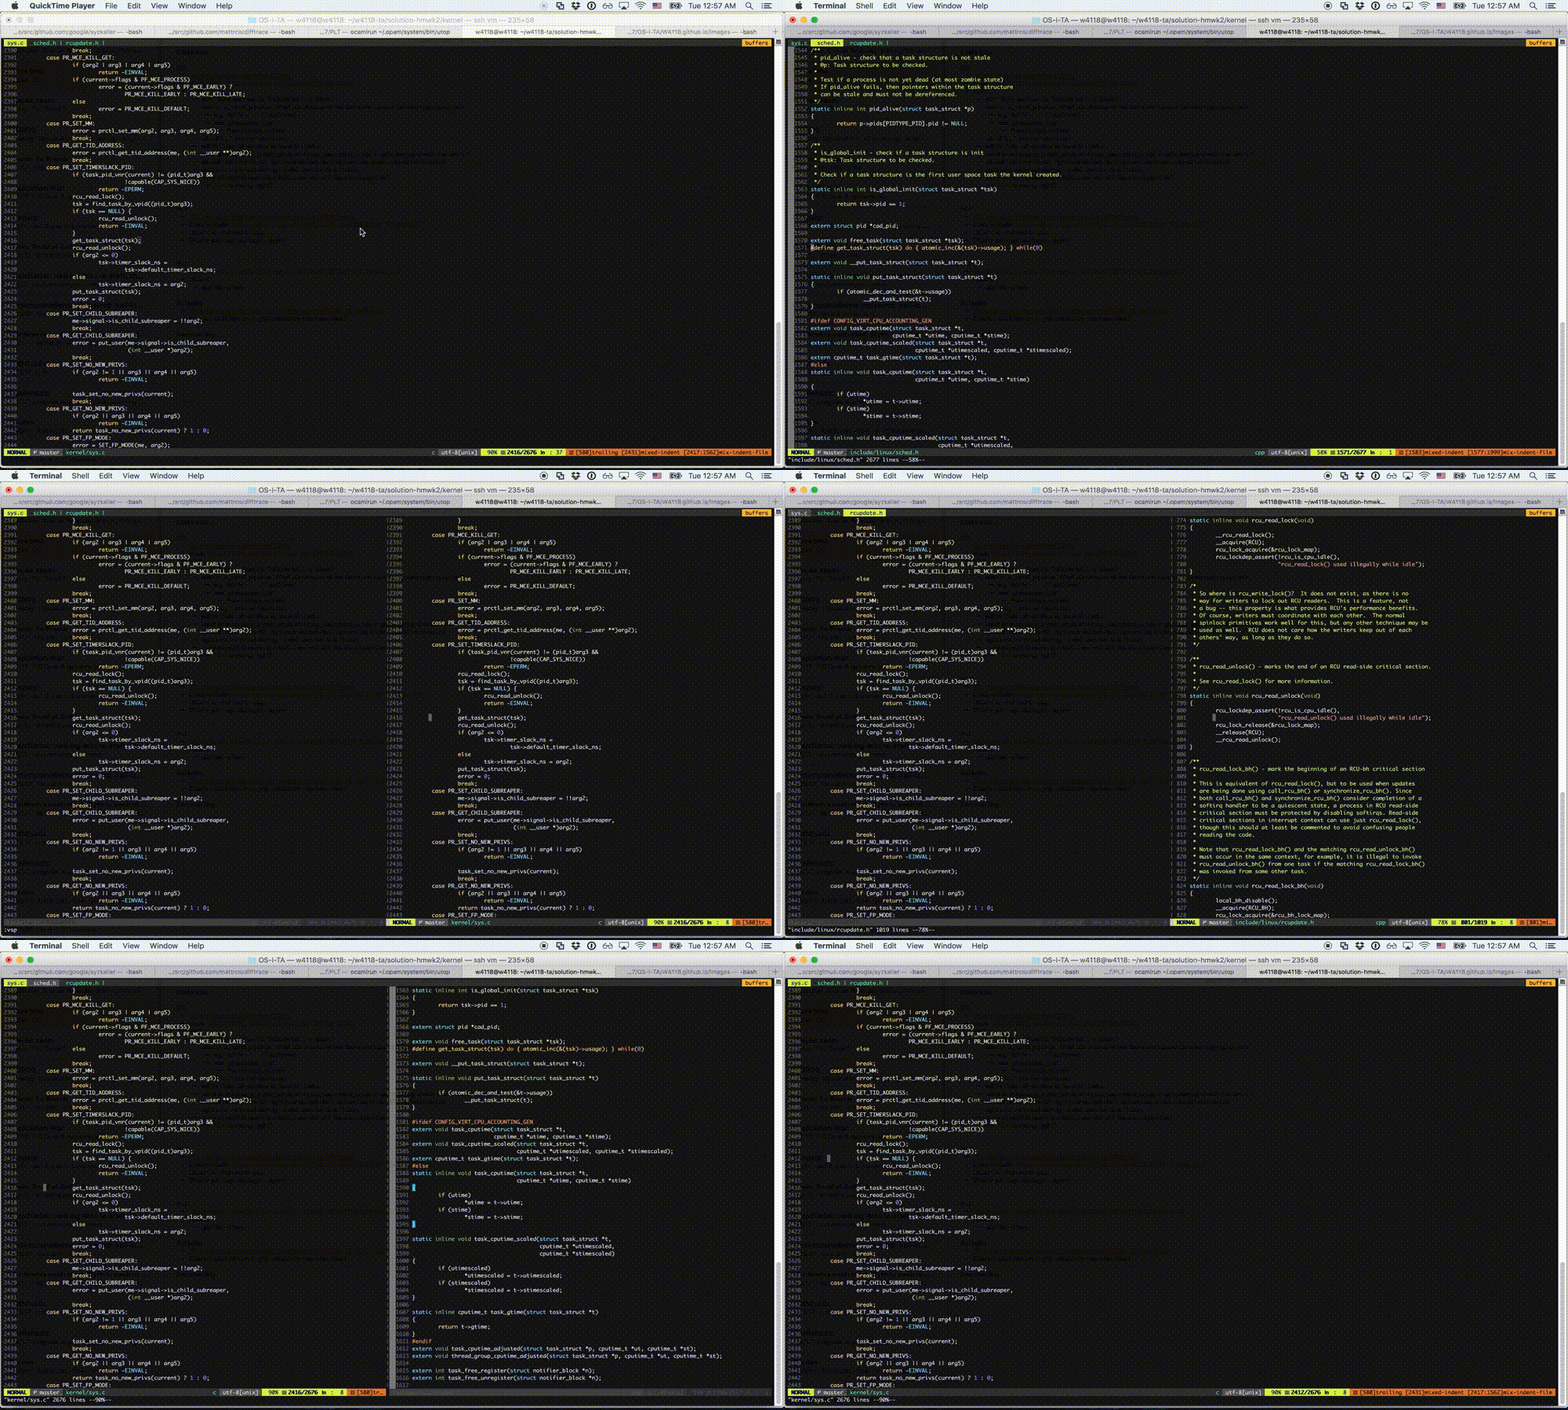
Here’s an example of what this should look like. Note that I never open a new tab. Instead, I have 3 buffers open (top line) and 1 or 2 windows open. To view a file, I simply navigate the window I want to the appropriate buffer.
Install Vim-Plug
Now let’s get to installing plugins.
vim-plug is a plugin manager for Vim. There are other plugin managers out there but we’ll be using vim-plug to install the remaining plugins, so do this first!
And add the following to your ~/.vimrc:
" automatically downloads vim-plug to your machine if not found.
if empty(glob('~/.vim/autoload/plug.vim'))
    silent !curl -fLo ~/.vim/autoload/plug.vim --create-dirs
    \ https://raw.githubusercontent.com/junegunn/vim-plug/master/plug.vim
    autocmd VimEnter * PlugInstall --sync | source $MYVIMRC
endif

" Define plugins to install
call plug#begin('~/.vim/plugged')

" All of your Plugins must be added before the following line
call plug#end()
After adding some plugins, run
:PlugInstall
Now all plugins will be installed inside ~/.vim/plugged and they will be
automatically added to your vim runtimepath.
Remapping Leader
Vim has the concept of a “leader” key, which is used to program personal
keyboard shortcuts. By default, it is mapped to \, which is a little difficult
to reach. I suggest mapping it to either space or comma ,
(I prefer comma). In your ~/.vimrc, write either
let mapleader ="\<Space>"
or
let mapleader = ","
We will be using leader keys through the rest of the guide. When you see
something like nmap <leader>l :bnext<CR>, it means we are mapping the keyboard
shortcut \<leader\> + l to the action :bnext<CR>.
Bufferline Display
Airline is a package to display
status information such as git branch and what buffer you are currently viewing.
Add this plugin to your ~/.vimrc.
" Define plugins to install
call plug#begin('~/.vim/plugged')

Plug 'vim-airline/vim-airline'

" Optional
Plug 'vim-airline/vim-airline-themes'

" All of your Plugins must be added before the following line
call plug#end()
And in your ~/.vimrc also add
" Airline
let g:airline#extensions#tabline#enabled = 1 " Enable the list of buffers
let g:airline#extensions#tabline#fnamemod = ':t' " Show just the filename
When it’s all done, you should have a header that looks like:

To easily maneuver around these buffers, add this to your ~/.vimrc:
" -----------Buffer Management---------------
set hidden " Allow buffers to be hidden if you've modified a buffer

" Move to the next buffer
nmap <leader>l :bnext<CR>

" Move to the previous buffer
nmap <leader>h :bprevious<CR>

" Close the current buffer and move to the previous one
" This replicates the idea of closing a tab
nmap <leader>q :bp <BAR> bd #<CR>

" Show all open buffers and their status
nmap <leader>bl :ls<CR>
Now to navigate your window left/right between buffers, just press \<leader\> + h or \<leader\> + l. To close a buffer, press \<leader\> + q.
Window navigation
To open a new window, enter:
:vspto open a vertically-split window:spto open a horizontally-split window
You can also use Ctrl-w + s or + v to make a horizontal or vertical split, respectively.
To navigate between windows, use: Ctrl-w + h|j|k|l to navigate left|down|up|right.
Alternatively, add this to your ~/.vimrc so that you can move between windows
using arrow keys:
" Use arrow keys to navigate window splits
nnoremap <silent> <Right> :wincmd l <CR>
nnoremap <silent> <Left> :wincmd h <CR>
noremap <silent> <Up> :wincmd k <CR>
noremap <silent> <Down> :wincmd j <CR>
To close a window, press Ctrl-w + c.
Ctrl-p and Nerdtree
The Linux kernel is a massive code base, so for easy navigation we’ll want to add a filename grepper (ctrl-p) and file tree (Nerdtree)
" Define plugins to install
call plug#begin('~/.vim/plugged')
...

" Browse the file system
Plug 'scrooloose/nerdtree'

" Ctrlp
Plug 'kien/ctrlp.vim'

...

" All of your Plugins must be added before the following line
call plug#end()
Now add the following to your ~/.vimrc:
" ctrl-p
let g:ctrlp_custom_ignore = {
    \ 'dir':  '\v[\/](\.(git|hg|svn)|\_site)$',
    \ 'file': '\v\.(exe|so|dll|class|png|jpg|jpeg)$',
\}

" Use the nearest .git|.svn|.hg|.bzr directory as the cwd
let g:ctrlp_working_path_mode = 'r'
nmap <leader>p :CtrlP<cr>  " enter file search mode

" Nerdtree
autocmd StdinReadPre * let s:std_in=1
autocmd VimEnter * if argc() == 0 && !exists("s:std_in") | NERDTree | endif
autocmd bufenter * if (winnr("$") == 1 && exists("b:NERDTree") && b:NERDTree.isTabTree()) | q | endif
map <C-n> :NERDTreeToggle<CR>  " open and close file tree
nmap <leader>n :NERDTreeFind<CR>  " open current buffer in file tree
Now if you want to search for and open a file, press \<leader\> + p. This is analogous to Cmd-r in Sublime.
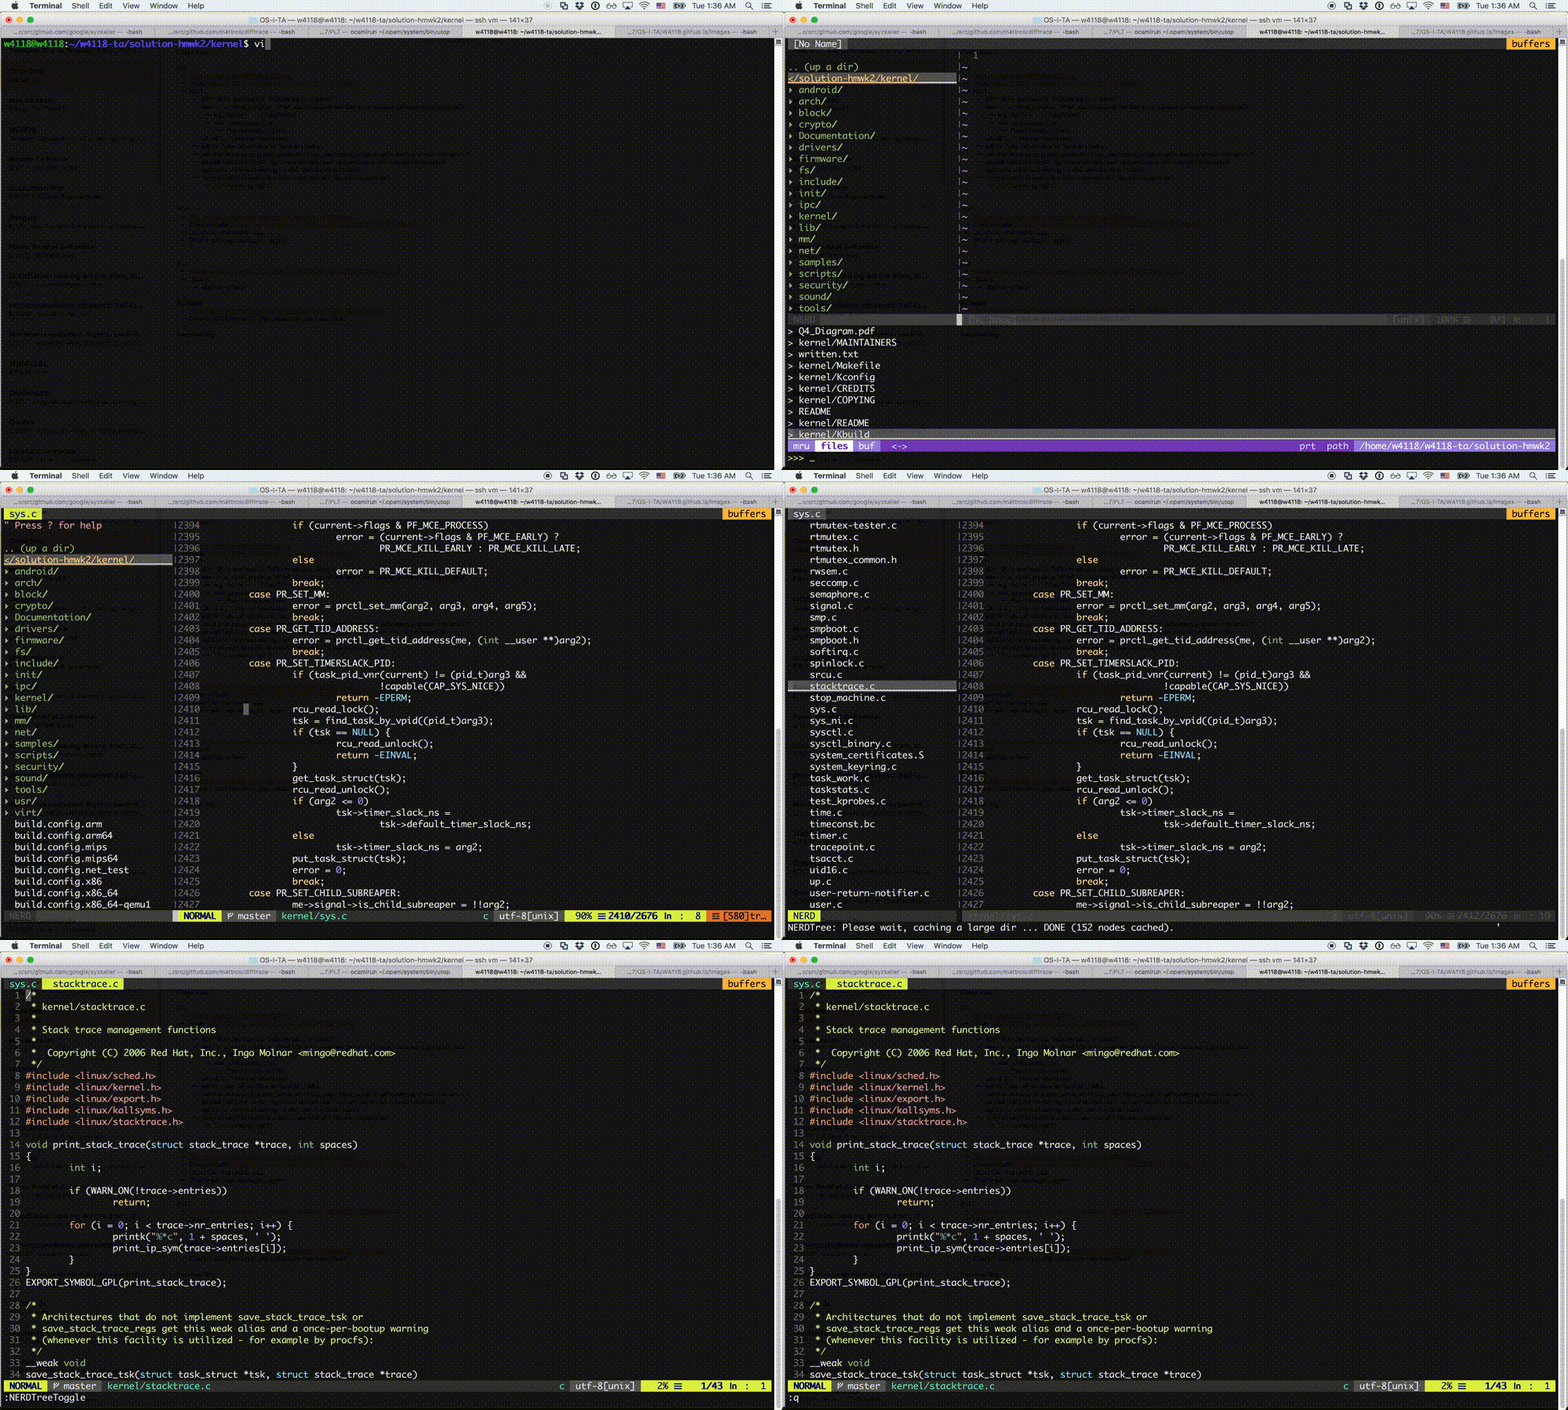
Nerdtree will show a file tree in the window on the left of your screen. To collapse/expand it, press Ctrl-n. To expose your current working file in the file tree, press \<leader\> + n.
Altogether it looks like this:
YCM
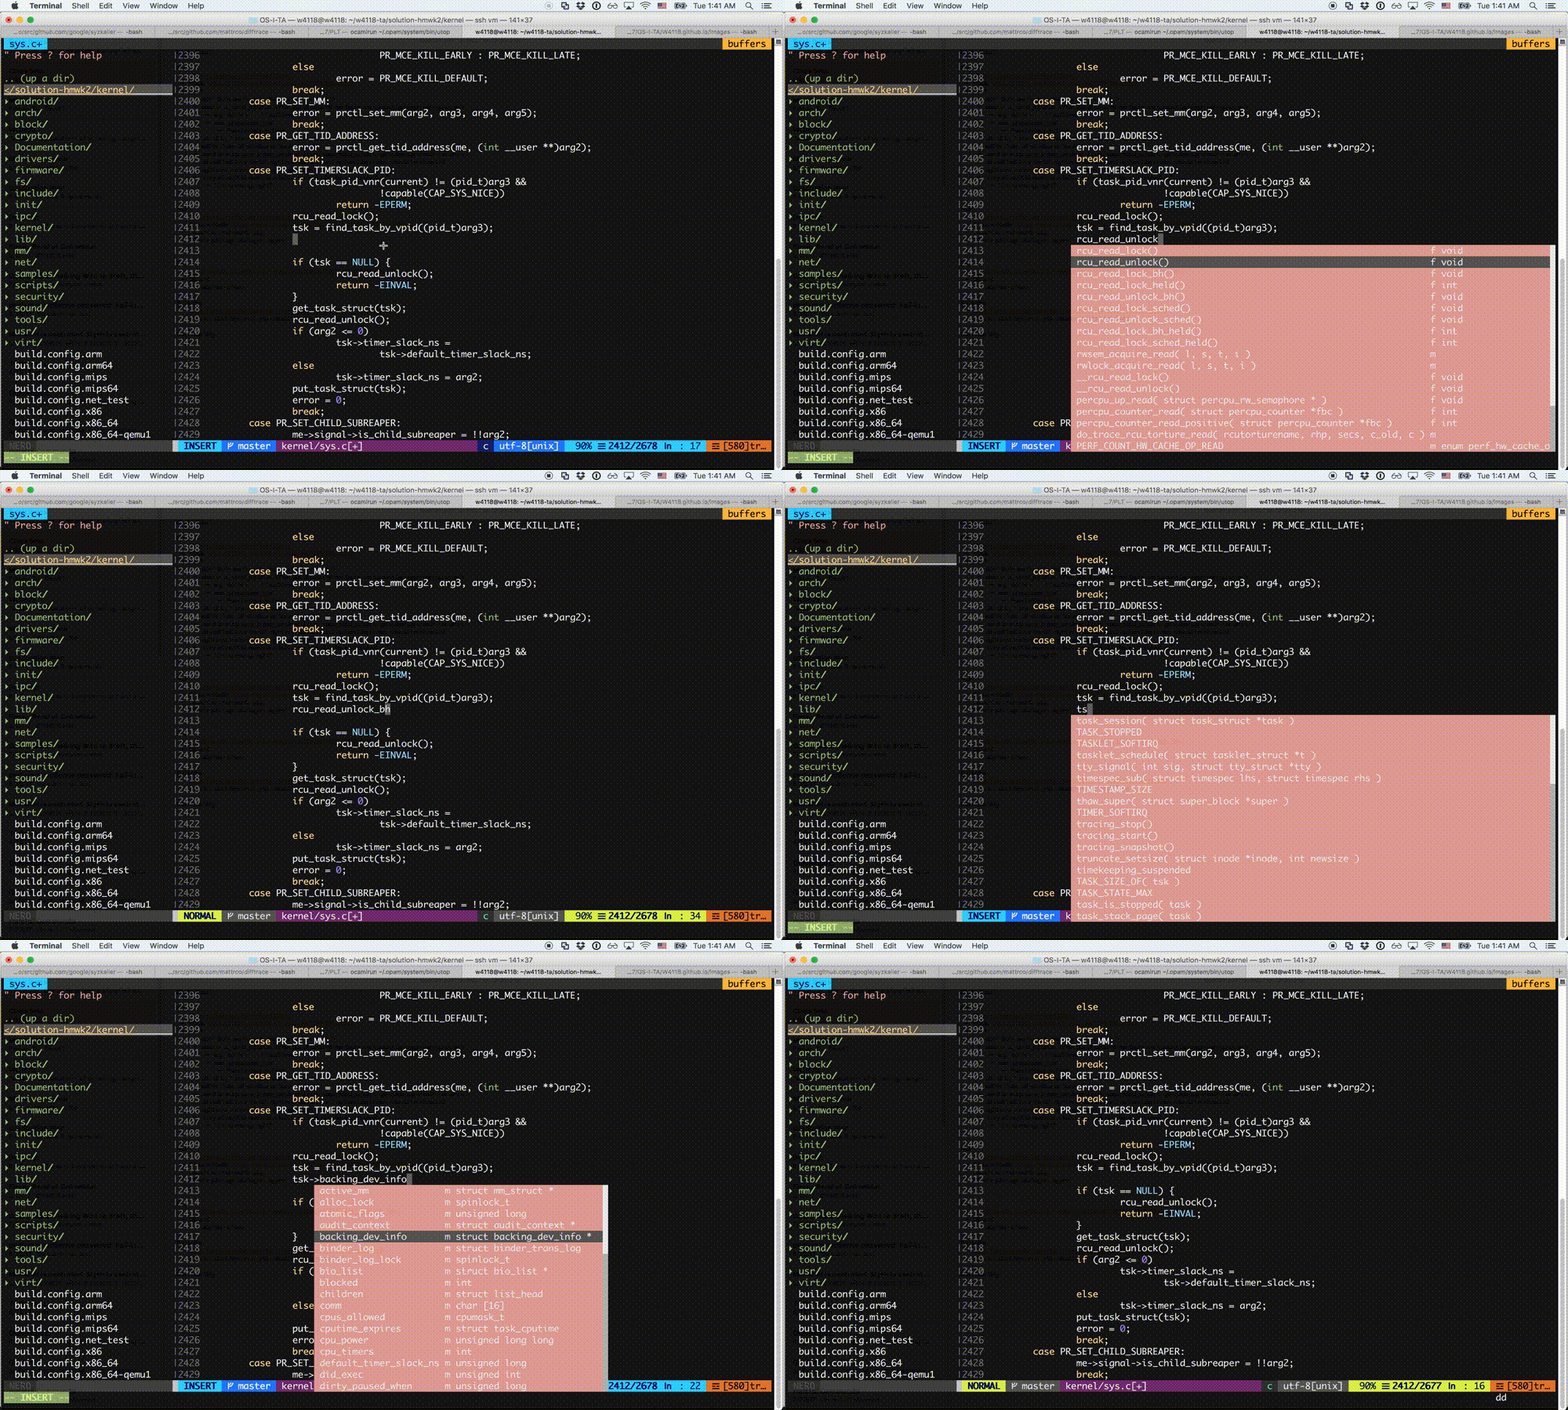
Next we are going to add semantic auto-complete through a plugin called YouCompleteMe. This part is a little involved, so here’s a demo first so you can decide if it’s worth the setup:
Firstly, install YCM
" Define plugins to install
call plug#begin('~/.vim/plugged')
...

" YCM
Plug 'Valloric/YouCompleteMe'

...

" All of your Plugins must be added before the following line
call plug#end()
Then,
$ cd ~/.vim/plugged/YouCompleteMe
$ git submodule update --init --recursive
$ ./install.py --clangd-completer
And add the following to your ~/.vimrc:
" Modify below if you want less invasive semantic auto-complete
let g:ycm_semantic_triggers = {
    \   'c' : ['->', '.'],
    \   'objc' : ['->', '.'],
    \   'cpp,objcpp' : ['->', '.', '::'],
    \   'perl' : ['->'],
    \ }

let g:ycm_complete_in_comments_and_strings = 1
let g:ycm_key_list_select_completion = ['<C-n>', '<Down>']
let g:ycm_key_list_previous_completion = ['<C-p>', '<Up>']
let g:ycm_autoclose_preview_window_after_completion = 1

set completeopt-=preview

" Optionally suppress all error messages generated by YCM:
" let g:ycm_show_diagnostics_ui=0

" Optionally remove automatic identifier-based completion:
" let g:ycm_min_num_of_chars_for_completion = 99
YCM utilizes clangd, a language server that performs semantic auto-complete
(along with plenty of other features). We have to provide clangd with a
compile_commands.json file, which specifies the simulated compilation flags
clangd should use when analyzing your code. Luckily, Linux provides a script
to generate this file (For projects that do not have such a script, see
compiledb and/or bear):
$ cd <path-to-homework-assignment>
$ make # Only need to do this if you haven't built the kernel yet
$ scripts/clang-tools/gen_compile_commands.py
YCM will automatically detect any compile_commands.json files on startup, so
this is the final step! Semantic auto-complete will now show up when trying to
access the elements of any structs/unions (by using . or ->). You can also
manually trigger semantic auto-complete by pressing Ctrl+Space.
One other useful feature clangd supports is GOTOs. For convenience, you can
add one more mapping to your ~/.vimrc:
" Map GoTo functionality
nmap <leader>] :YcmCompleter GoTo<CR>
Now, when your cursor is over any function call, macro, or header file, enter this mapped key combination and you will automatically jump to the relevant declaration or file in a new buffer!
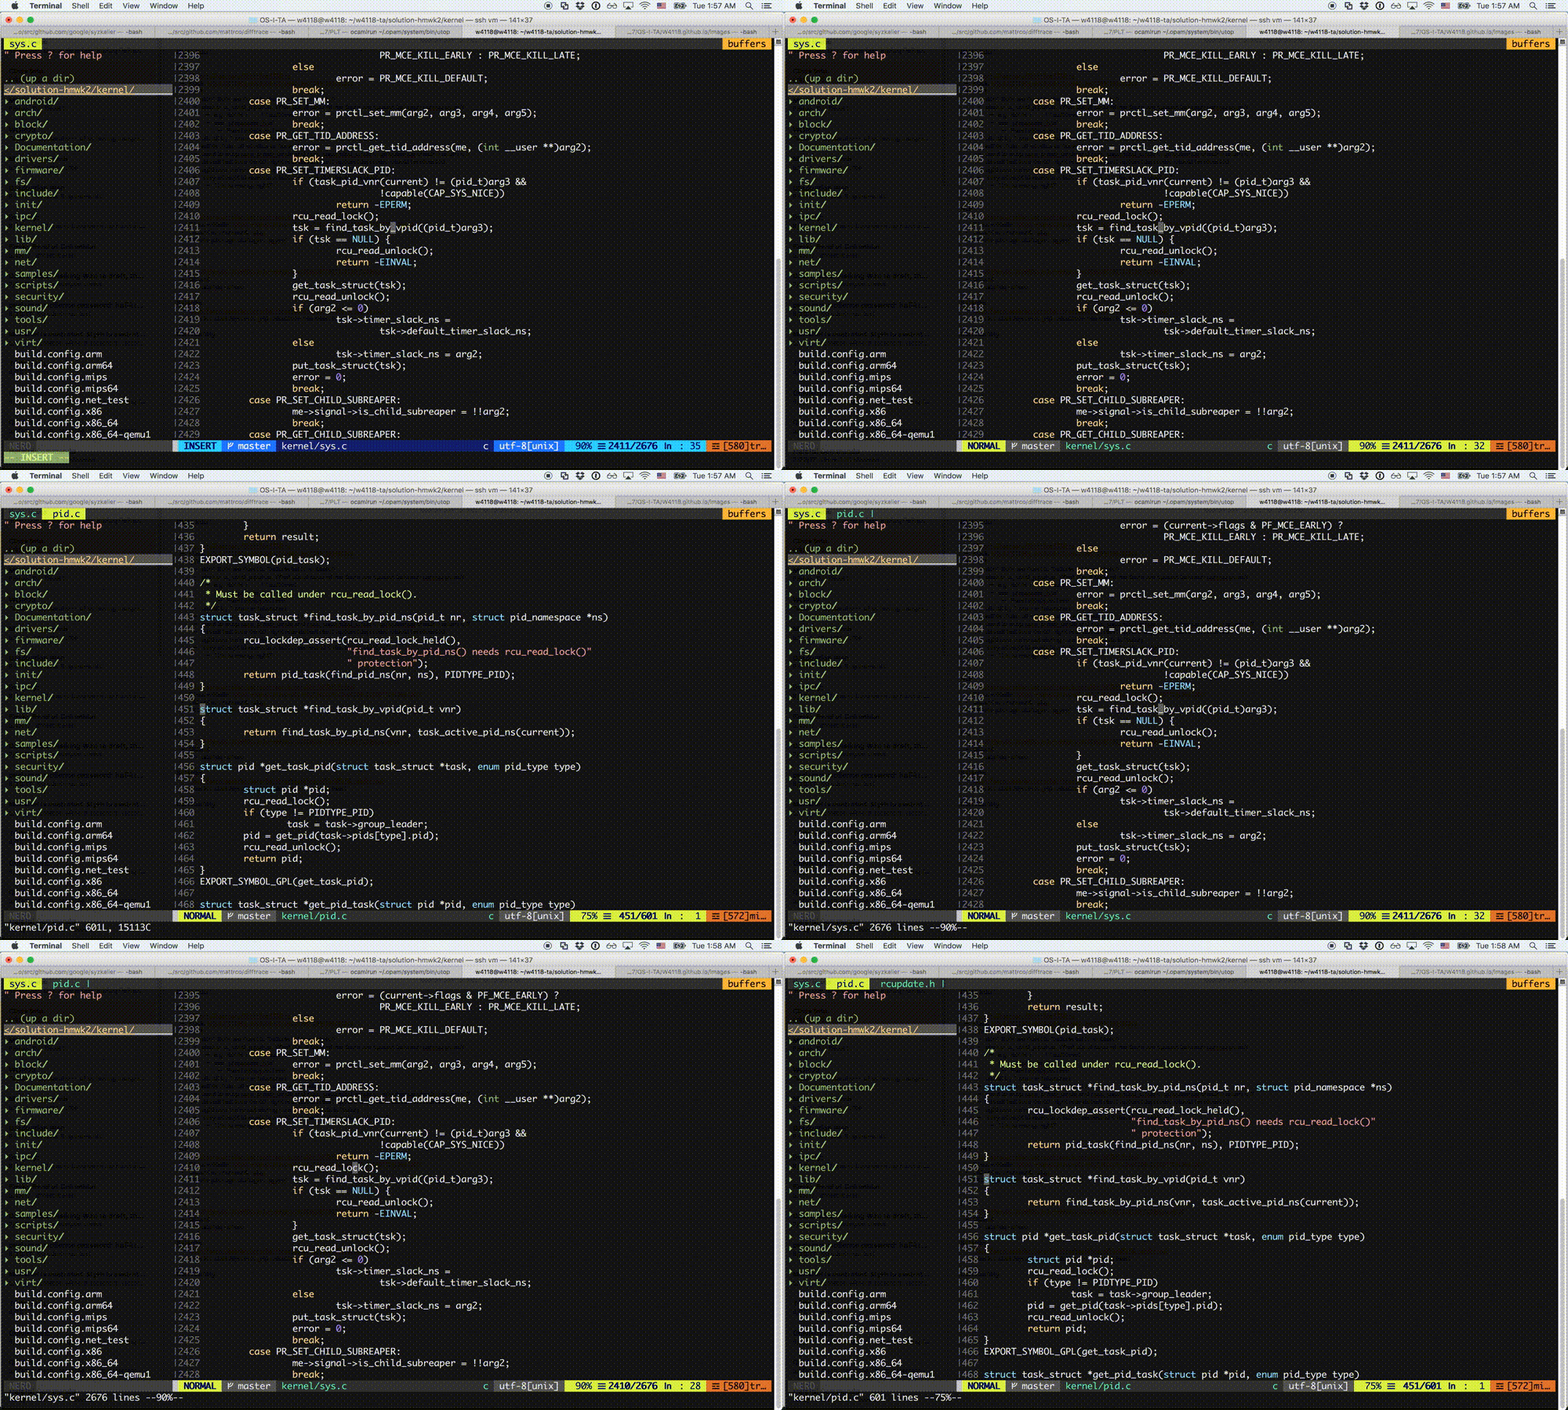
Important Note: for YCM in the kernel to work properly you need to be inside the kernel when you activate vim, e.g.
$ cd <path-to-homework-assignment>/kernel && vim
Optional: If you chose not to suppress all warning messages, YCM will likely
throw multiple error messages at the beginning of each document referring to an
Unknown argument or Unsupported option. These warnings will not affect YCM’s
functionality; however, if you would like to suppress these error messages you
may create a file at ~/.config/clangd/config.yaml and write:
CompileFlags:
  Remove: [ -mpreferred-stack-boundary=*, -mindirect-branch*,
            -fno-allow-store-data-races, -fconserve-stack, -mrecord-mcount,
            -mfunction-return=*, -mskip-rax-setup, -mno-fp-ret-in-387,
            -mno-var-tracking-assignments, -femit-struct-debug-baseonly,
            -mabi=lp64 ]
You may add any other compiler flags that show up as an error to this list as you need.
Cscope
This is the final step: Efficiently browsing code.
Cscope is a code browser that works in your terminal and within vim. It is far more powerful than a standard grepper (such as the one at elixir). For example, Cscope can answer:
- Where is this variable used?
- What is the value of this preprocessor symbol?
- Where is this function in the source files?
- What functions call this function?
- What functions are called by this function?
- Where does the message “out of space” come from?
- Where is this source file in the directory structure?
- What files include this header file?
To install on Debian:
# apt install cscope
Verify installation succeeded by running cscope. This should open up the
Cscope browser in your terminal window. To exit, use Ctrl-d.
To use Cscope, you will need to first build the Cscope database for a given codebase. In the top level directory of the linux kernel, this can be done via:
$ cd <path-to-homework-assignment>
$ make cscope
This will generate kernel/cscope.files, which lists all kernel files Cscope
will include in its project database.
Then
$ cd kernel/
$ cscope -b -q -k
This builds the Cscope db, which is comprised of three files: cscope.files,
cscope.in.out, cscope.out. Do not touch these!
- If you do accidentally delete them, run
cscope -b -q -kin the kernel directory to regenerate.
To use the Cscope browser:
$ cd <path-to-homework-assignment>/kernel
$ cscope -d
Use Tab to alternate between the menu and the list of matching lines. See manpage or type ? in the Cscope browser to learn more.
Demo:
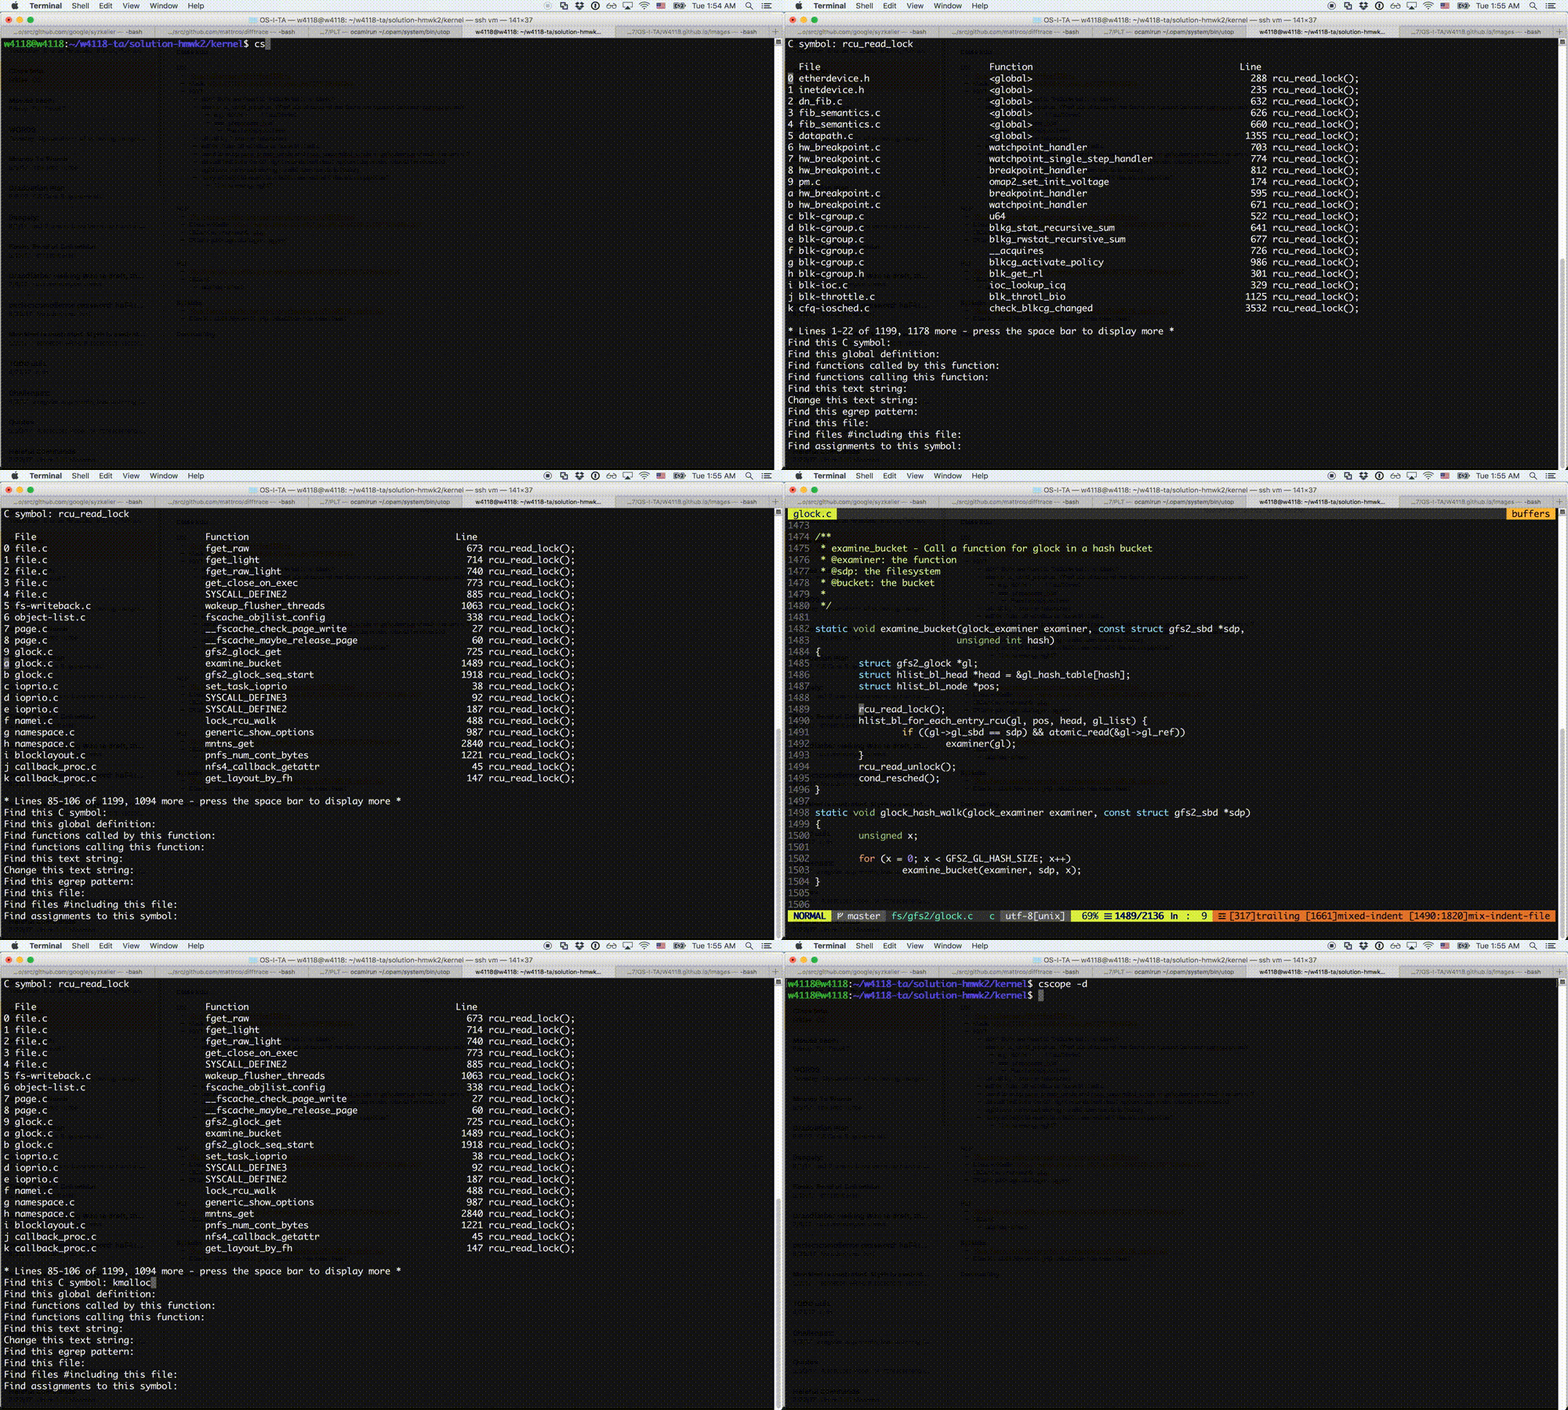
We recommend using 2 terminal windows when working: one dedicated to vim/writing code, and the other dedicated to Cscope/browsing code.
Fin
And that completes this developer workflow guide. Congrats if you’ve made it this far; hopefully the time spent reading this will be vastly outweighed by time you’ll have saved in this class and beyond.
You can also take a look at Howon’s example ~/.vimrc here.